Monday, August 27, 2012

Hi Girls...

Well, now that I've gotten my craft room into some semblance of order with my new modular storage system from Michael's, I was finally able to get my creative juices flowing again, so I settled into my chair at my craft table yesterday afternoon and I made this new art collage using a page from an antique Victorian photo album as the base.


I chose a theme of pink, red and aqua blues which makes for a cheery combination of colors.  And we can all use a bit of cheer in our day can't we ??? 

Wishing you all a cheerful and great week ahead !!


Sunday, August 26, 2012

Changes In My Craftroom...

Hi Girls,

In my last post, I mentioned that one major change had already occurred in my craftroom with a new window being installed.   

Well, in addition to that, I decided to move out the old loveseat that was in my craftroom to make room for some more functional storage.  Where my old loveseat used to be, now resides this...


These are the Recollections modular storage cubes that you can purchase from Michael's craft store.  


My initial plan was to have 12 of them, three high and four across, but then I realized that I wouldn't be able to do that as unfortunately, the bedroom doesn't have an overhead light and the electrical outlet that connects to my light switch is on this wall (behind the wicker sewing basket/stand) and I can't block it with the storage cubes.


I love how it looks in the room.  So much better than the loveseat that's for sure.  And of course, it gives me more room to display some of the things I've made and other things in my collection.


It's still a work in progress, but it's a hundred percent better than it was before. And I still might buy a few more of the cubes and do just a single stack of three cubes to the right of the outlet. 
 
So instead of that old loveseat that was usually just a dumping ground for all sorts of stuff,  this is the view I now have when I look over my shoulder when I'm working away at my craft table.


Changes are definitely a good thing sometimes!!!

Monday, August 20, 2012

Thrift Store Find "After"...

Yikes...

It's taken me longer than I planned to do a follow-up post to show you the "After" shots of my recent thrift store transformation, but my house has been in a bit of a shambles this past week on account of something that finally went from being a dream to being reality.

But before  I get to that, let's take a look back at one of my recent thrift store finds that started out as this..


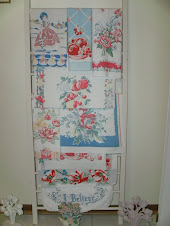
And has now been transformed into this....


Nothing fancy, just some creamy white paint to brighten the piece up and make it fit better into my cottage/shabby chic decor. It now resides proudly in my craftroom which has undergone some major changes over the past few days.

And those changes will explain why my house has been in a shambles for the past several days. 

A nearly ten year long dream finally became reality on Friday when I had all new windows installed in my house.  The windows I had before were just downright gross what with the fog buildup between the window panes that left the windows always dirty looking and hard to see through..

A before shot of my living room window shows the problem very clearly.....


So at one point on Friday, these were my living room and craft room windows (or should I call them a gaping hole in the wall ?) ...


But in the end, all the upheaval was worth it as my new windows are awesome..


That isn't the only change that has occurred in my craftroom.  Some other change have taken place to, but I'll share more about those in my next post.

Until then, enjoy your week!!

Monday, August 13, 2012

Thrift Store Finds "Before"........

Hi Girls...

Well, it's Monday and I'm fortunate to be on vacation from work this week.  No fancy trips planned.  Just hanging out at home for the most part, along with some probable visits to my local thrift and antique stores.

I've been saving a couple of earlier thrift store finds with the intent of giving them a paint makeover during my vacation and today, you get to see the "before" shots.

I'm not exactly sure what you would call this first item, but its a fabulous organizational piece that has a large center shelf, a smaller top shelf and two drawers.  It stands probably one and a half to two feet in height and is made of very heavy/sturdy wood.  It's a great piece and I was thrilled to find it as I know it will work great in my craftroom.  I paid $10.00 for this piece.


And then there is this dark slate blue wicker wall shelf.  The color is definitely not one that I care for, but I know it can easily be changed.  Other than the color, its in great shape and only cost me $5.00.


Come back later this week to see how they look "After".  

Tuesday, August 7, 2012

I've Been Busy.....

Hi Girls..

I've been on a roll over the past several days creating away in my craft room, making some more pretties that I'll either display around my home, or maybe even pass them along to someone else if I can bear to part with them.

That's the one thing I've had such a hard time doing.  I just love how all my little artsy/crafty projects turn out that I find myself wanting to keep them all.  I really need to change that one of these days, or I just may find myself on that "Hoarders" TV show.

Well, here a my latest creations.  The first three were made using 3 x 6 inch pieces of pre-cut wood pieces. They came pre-packaged in packs of 6 to create mini-albums.  I chose to use them as individual pieces this time, getting more bang for my buck that way....


You'll notice that I covered the hole on these as I thought they were just the perfect size to display on an easel instead of hanging on the wall..

The next one I made using another heart shaped piece of chipboard (still need to add the ribbon on this one for hanging)..


And for this final one, I used just a simple rectangle shaped piece of chipboard, turning it into a pretty collage..


I find myself drawn to scrapbook papers that have a shabby/vintage/distressed look to them as they really suit the style that I'm going for in my crafting.  For my latest projects I distressed several of them even more by using some of the Tim Holtz distress inks around the edges to give them an even more vintage look.

Maybe it's time for me to think about having a little giveaway.  What do you think? Would any of you out there be interested in winning one of my little wall hangings/collages for yourself? 

If I find that enough of you are interested, I will definitely have to do a giveaway for sure.  But for now, it's back to the craft room to create some more pretties.

See you soon!!!

Saturday, August 4, 2012

Pink Pretties......

Hi Girls...

Snapped a few pictures of some pink pretties from my craft room to share with you today.

Some handmade, like this sweet shabbified bird...


And some not handmade, like this jar of pretty paper roses...


And this hobnail candy dish with some pretty pink plastic lacy hearts.


Have a great weekend!!!!

Saturday, July 28, 2012

A New Thrift Store Find Transformation...

Hi Girls...

If you've been a long time visitor to my blog, you may recall that about this time last year, I shared with you one of my very first thrift store transformation projects which was turning this boring but functional desk caddy.....


Into this.....


You can see that post here.

Well, I recently found a similar desk caddy at one of my local Goodwill stores for just a mere $2.99 and of course, I just had to buy it as I've been itching to give something new a little makeover.

Here's what it looked like when I bought it....


When I first started this project, these were the papers I intended to use, already cut to size.  I first cut pieces from some regular heavy card stock paper to get my pattern pieces, then I traced them onto my scrapbook paper before cutting...


But then, I changed my mind about some of the scrapbook papers I wanted to use, so this pile shows my final choice...


After choosing the papers I was going to use, I then painted the edges of the desk caddy to cover the areas that I knew wouldn't be covered by the scrapbook paper..


I let that dry overnight, then all I had to do was Modge Podge all the pieces in place.

And this is what it looks like now..


For the front edge, I had to do a bit of fudging to cover the entire section.  The desk caddy is more than 12 inches wide so I was short a few inches on the paper as the paper was only 12 inches wide.  I had to cut an extra smaller piece to cover the gap..


I have to admit that transforming this desk caddy was a bit more difficult than the first one because of the curved edges which made it much harder to cut the paper to size.  The first one I did had simple square edges.  With the curved edges on this one, I had to do a lot of delicate trimming of edges to get them to fit just right.

But it was worth it as I think it turned out pretty good.

Just remember.  Don't pass up good functional items from the thrift stores just because they don't look the way you want them to.  Things like this can be transformed very easily in very little time.

Well, I hoped you enjoyed seeing my little weekend project. 

See you soon!!

Thursday, July 26, 2012

New Stamps.....

Hi Girls..

Just popping in real quick to show you two of my newest rubber stamps I recently purchased at Michael's when they were having a great sale on all of their stamps.  Plus,  I saved an additional 20% using a coupon.   


I think Michael's and JoAnne's have become two of my favorite places to shop as I love adding new supplies to my stash to use in my craft projects.  

Now, if I could just triple the size of my craft room and add some great furniture pieces for storage and display , I might just have an easier time finding places to display,  store and organize all of those things.

Well, until I can make my dream craft room happen, I guess I'll continue creating amongst all the pretty scrappy things scattered amongst my craft table and on the bookshelf nearby.

See you again soon !!!

Monday, July 23, 2012

Crafting Shabby Style....

Hi Girls...

I was busy in my craft room this past weekend creating some more shabby style wall hangings and tags.  Something I love to do.

Here are my latest creations, starting with a shabby heart shaped wall hanging to which I added some paper crepe trim.


Then there is this pretty wall hanging that I added several different types of embellishments to.   The pretty background paper is some new scrapbook paper I found recently.  It is from the new Graphics45 collection called "Ladies Diary".  The entire collection is just gorgeous..


And last, but not least is a tag I created using up a few more of the small paper scraps from my stash....


Well, as you can see, it was quite the productive weekend for me.

Now I must go see what other pretties I can create.